Friday, December 30, 2011

{Let's Ring in the New Year!}

When I think of New Year's Eve..I think..

SPARKLE
METALLIC
FLASHY
SHINE
GLAM

How do we achieve the {sparkle, metallic, flashy, shine, glam} at our New Year's Eve party this year?...both in decor and in attire?..here are some ideas..
Find a sequence-esque dress, top, or bottom in a silver, black, gold, or bright pop of color. Pair a top with a nice fit in a dark jean or black pant and accessorize, accessorize. Pair a sparkly bottom with a dressy solid color top! New Year's Eve is a chance to go all out! Don't be afraid to take a chance in your attire!

Example Photos (from my Pinterest search)..

The Perfect Dress!
Dressy Top with Sequence Bottom!
Sequence Top and Black Pants!

If you don't already have something glamorous..consider looking at Nordstrom Rack or Forever 21..to keep your spending to a minimum! Fabuless!
In terms of decor items for an in-home party..make it flashy. Try to make your home feel exciting and fresh..sparkly, glamorous, etc. Do this by using lots of golds and silvers with pops of color! You could use glass vases and fill them with beads or metallic ornaments. Use glittery candles as accents..and be sure to buy some fun champagne/sparkling cider glasses!

Gold/Silver
Ideas from MarthaStewart

Some of you, like my husband and I, may not have any big New Year's plans..maybe you're planning to have a few family members over..a few friends..play some games, keep it casual..that's great! If you have kids participating in at least a portion of your evening, it'd be great to have a craft for them to make..party hats maybe?!? It's also important to have kid friendly foods, in addition to things the adults will enjoy..

Family Friendly Ideas from Martha Stewart!
Chex Mix Recipes!

Most importantly, have a good time with the people you love.
Here's to 2012! We wish you all a very Happy New Year!


sincerely fabuless,
Las Vegas and the windy city.

Sunday, December 25, 2011

{Happy Holidays to You}

We just wanted to take a moment and wish each of our readers a very Merry Christmas! We hope you've enjoyed our posts from the past month, this past week especially! We hope you each have a fabuless time with family and friends this holiday!

Be sure to check back later this week for some New Year's ideas!

Thanks for reading!


sincerely fabuless, Las Vegas in Virginia
and the windy city in New Mexico.

Saturday, December 24, 2011

{Christmas Morning Pancakes!}

It's almost Christmas (morning)! For those of you looking for a deliciously simple breakfast recipe to whip up quick after present opening, you will LOVE these pancakes, and so will your company! If the majority of your guests are children, throw in some red and/or green food coloring to give your breakfast a fabuless festive look!

I always talk to people who say "I don't make homemade pancakes, I just use Bisquick" or "I have never found a recipe for pancakes that I really like so I don't ever make them" - the truth is, Bisquick taste like a biscuit turned into a pancake and there is no excuse not to make homemade pancakes, at least not anymore because I am sharing with you the Perfect Pancake Recipe!


Best Ever Homemade Pancakes

- 2 cups AP flour
- 2 eggs
- 2 cups of milk
- 2 TBSP. Baking powder
- 1 TBSP. sugar
- 1 tsp. salt
- 1/3 oil

Whip up all the ingredients, bake on a hot griddle and enjoy!


These pancakes turn out perfect time and time again. The best part is, you can add things to them and it doesn't change the consistency. Sometimes I like to throw in a little cinnamon to change the flavor - or if you want to trick your kids into eating "healthy", throw in some cooked oatmeal, bananas, berries or one of my favorite, chocolate chips (p.s...if you do chocolate chips, don't put too many, the flavor goes a long way and I would suggest using mini chocolate chips - they are prettier and don't overpower the flavor of the pancake).

My sister Leigh taught me a trick to get the right size pancake and the same size pancake (it makes for a prettier presentation if they are the same size). If you have a cookie scooper, use your cookie scoop to scoop out the batter onto your hot griddle. My cookie scooper is only an inch but as the batter spreads it makes perfect silver dollar pancakes that are easy to flip and eat!


sincerely fabuless, in Virginia
for the holidays

Friday, December 23, 2011

{It's Beginning to Look a lot like Christmas}

According to my Google search for a Christmas song list, the top 10 Christmas songs are..

White Christmas by Bing Crosby
The Chipmunk Song by The Chipmunks
Rudolph, The Red Nosed Reindeer by Gene Autry
RI Saw Mommy Kissing Santa Claus by Jimmy Boyd
Jingle Bell Rock by Bobby Helms
The Christmas Song by Nat King Cole
Snoopy's Christmas by The Royal Guardsmen
Here Comes Santa Claus by Gene Autry
Little Drummer Boy by Harry Simeone Chorale
Donde Esta Santa Claus by Augie Rios


See top 100 Christmas songs here!

Pandora..start listening now!
**40 hours free each month! fabuless!

Enjoy some festive tunes at your holiday parties this year! Merry Christmas!


sincerely fabuless, the windy city.

Thursday, December 22, 2011

{Giving from the Heart}

My husband and I decided not to buy each other presents this year. We are planning to write each other a letter instead. I love to write letters, write in my journal, etc...and this was a great way to get my husband to write too. Even with plans for heartfelt letters, I felt like I'd still like to make my husband a little something for Christmas. As I was thinking about it, my mind reverted back to third grade when you really want to give your parents something special but don't have any money to spend..so you make them coupons..

"I will unload the dishwasher"
"I will vacuum the carpet"
"I will walk the dog"
"I will take out the trash"


...what a great gift!

I decided to do coupons for various massages (back, hands, feet, head), and also some for his favorite treats (homemade cinnamon rolls, chocolate cake), and a few others very specific to my husband..(30 min video game session, get out of dish duty free). It's fun to personalize it. You know your spouse best, so think of what coupons they'd be really pumped about. :) **Or you can use my ideas, whatever works!

I found some fun images and made my coupons..printed them out and attached them to green card stock...


Once I had my cards cut and ready to go, I sewed a little case for them with some fabric I had lying around..


Have fun creating this fabuless gift!


sincerely fabuless, the windy city.

Wednesday, December 21, 2011

{More Bows!}

I just had to do another post about bows because I made the easiest bows ever last night! Felt Pom Pom Flowers! Felt is such an easy and fun material to work with!

this is what you need..

felt
scissors
hot glue gun
clips


yes, that really is all you need!

All you do is cut your felt into 2 inch strips...fold horizontally and glue the open end shut (do NOT glue near fold!)..then cut notches into the fold. Roll and glue until in a tight spiral. Then, if you'd like to make your Pom Flower bigger, just repeat with another strip and add it to your spiral. Finish by covering a clip with felt and attach to bottom of flower. Done and done.


Here is the tutorial I used..Felt Pom Pom Flowers! Thanks Mrs. Priss!


sincerely fabuless, the windy city.

Tuesday, December 20, 2011

{So Bring Me Some Peanut Brittle}

There is NO WAY I can make it through the holidays without sharing this amazing Peanut Brittle recipe. Not only is it easy, it only takes one large stock pot and three ingredients to make it, and it tastes better than any other peanut brittle I have ever had - so fabuless!

Ingredients
1 lb of butter
2 cups of sugar
2 cups Raw Spanish peanuts (you can sometimes buy these at Wal-mart but we usually go to a Spanish market and can get a lot for a great deal)

Directions
Heat your butter until it is lightly foamy and then add the sugar - stir in the sugar continuously till bubbly/boiling.


Once your sugar and butter mixture is boiling, stir in the Spanish peanuts and continue to stir (about 10 minutes or so).


When you are close to being done, the peanuts will start to break down and the mixture will start to turn a light brown. Once it is a mid to light caramel color you take it off the burner and pour it on a buttered jelly roll pan or cookie sheet (with good edge).


Let cool and then turn it over on the counter, hit it (it should pop out) and break.


Once my husband finished whipping up a batch and it had hardened, I put pieces in a plain ziplock sandwich bag and stapled Christmas wrapping paper over the bag to give it a gift bag look (for less!). You can also use cute card stock or scrapbook paper to achieve this festive gift bag look.


Have extra cocoa laying around?..package it in a sandwich bag..then dip plastic spoons in chocolate and add candies (to make stirring spoons) to complete the cocoa gift set! See the picture below of an example of these cocoa gifts made by my sister Leigh...


..so cute, right?!

This peanut brittle recipe is a great dessert that can be made fast and is loved by all! And, be sure to spice up your holiday treats for your friends and neighbors with the fabuless gift bag idea! If you have any questions, feel free to email or message us!

sincerely fabuless, Candace in Virginia
for the holidays.

{The Classic Gift}

T-minus six days until Christmas. Some of you may be done with your Christmas shopping, but for many of us there always seems to be those few people still lurking on the list. If those people left on your list happen to be children, read on.

Sometimes it is hard to find the perfect gift for a child because you may not know their interests, what toys they may already have or not have. This is especially true when you are traveling for the holidays. What you bought a child the previous year wouldn't work one year later. They mature quickly and their interests and the toy trends change. Even worse, the last thing you want to do during the holidays (especially right before the holidays) is brave a toy store.

If you are looking for the perfect gift for a child, stick to a classic present: books.

Here is a great list by Parents.com with information on top rated books organized by age...

Top Rated Books!


sincerely fabuless, Candace in Virginia
for the holidays.

{Blockin' Around the Christmas Tree}

Blocks. Most kids love blocks. The only problem with the classic wooden blocks is the fact that they are really hard. How do we solve this problem? We make pillow blocks!

I was trying to come up with a fun Christmas gift I could make for my friend's little baby boy, so I got on the computer to find some inspiration. I came across some blocks made out of fleece, with unfinished edges and a felt duck cut out and stitched on. I wasn't in love with them, but I did find some inspiration and took it to the next level.

I have lots of fun fabrics that I've used for multiple projects, so I pulled those out and started selecting prints that would work for a baby boy (a lot of my stuff is girly!). I then traced around a square tissue box (thank you Kleenex!) to create the different sides of my blocks.


With the sides cut out, I arranged them to see how the block would come together. Each block requires 6 squares.


Let the sewing begin. *I cut out a few shapes and also the letter "S" for "Simon" out of felt, and sewed those on to the right sides of a few of the squares (so each block would have a couple felt shapes). Then I started sewing two squares together at a time..at their common edge (with right sides facing each other). Gradually it took on a box shape, and when I got to the last edge, I left about 2 inches open for the stuffing process.


Once each of the blocks had been sewn..I turned them right side out, pushed the corners out, and I stuffed them using leftover stuffing from the pillow I took apart for a previous project (see Zip It..Button It..)..fabuless. When they were stuffed to my liking, I hand stitched them shut.


When the time came to wrap this little Christmas gift, I tried tying a bow around the blocks but it just wasn't working out, so I decided to make a bag for them! I love the impulsive sewing projects! I didn't really measure anything. I just cut three strips of fabric and sewed them together (same process as with the blocks..right sides facing each other). I then cut a square for the bottom and attached it to the rectangular piece. I added a drawstring to the top by folding an edge over and pulling it through. Done!


My little Cora will be getting some blocks as one of her Christmas presents this year too! I'll add a picture once I've finished them! Have fun blockin' around the Christmas tree!

Here are Cora's blocks..and the bag I made for them...


**this was before I stitched the openings shut**


sincerely fabuless, the windy city.

{Simply "Magnet"ficent"}

I love to craft and create and just realized the other day that even more, I love to watch other people craft and create. My sister Leigh is one of those people who dabbles in different projects and excels at all of them. I love to see the things that she comes up with and creates. I love watching what she comes up with in particular because she is very quiet about her talents and most of the time you don't even know she is working on anything and then BOOM, she shows up with a masterpiece. This hidden talent of hers has earned her the nickname "Martha" in our family - after the one and only, Martha Stewart.

Leigh has three young children who attend school - two in elementary school and one in preschool. Having just bought and moved to a new house the first week of December, she really wanted to create a gift for the teachers that was inexpensive or possibly free based on the craft supplies that she already had on hand - thereby creating a fabuless teacher gift for the holidays.

After digging through her craft supplies, she realized she had the items on hand to create magnets for the teachers. I watched this project evolve from start to finish and it was so fun to sit in her beautiful new kitchen and watch her craft and create one of the cutest things I have seen for a teacher.

She started with the following supplies:

1. Clear flat glass marbles (these can be found in the fake flower section at Michael's Arts & Crafts)
2. Mod Podge
3. Scrapbook paper
4. Cricut machine
5. small circular magnets


Using the cricut machine, she cut out the individual letters of each of the teachers name. She then mod podged the letter to a circular piece of scrapbook paper and then used mod podge to attach this two piece item to the back (flat side) of the stone. Already beautiful, I know. Keep reading, it gets even better. Once each of the rocks has dried, she used a strong glue to attach the small round magnet to the back of the rock. I was already impressed by these cute magnets and though how perfect a gift that is for a teacher...and then Martha kept at it.

Leigh then got out a piece of scrapbook paper and cut it to match what would look like an oversized postcard. I wasn't sure where she was going with this and if it was even for the same project, but I watched intently. She then cut out a piece of a cream colored paper the same length as the oversized postcard and about three inches wide. Once cut, she got out one of her scrapbooking tools, an oversized hole punch and cut holes down the strip of the cream paper. Again, still wondering - is this the same project?

She then took each of the magnets and positioned them in each of the holes so that they were displayed pretty spelling out the name of each teacher - so cute! Note - she ran a line of scotch tape along the back of the magnets to hold them in place on the punched out paper. I believe she also took a strip of adhesive magnet and ran that along the back as well to keep the magnets in place. She also took the round scrapbook buttons that you use to raise a picture or cut out and put one on each corner to raise the strip a little bit so that the magnets had space on top of the postcard.

I was amazed and thought this project was complete...but it wasn't...Martha pressed on.

I looked away for about a minute and turned around to see that she had cut two hole punches at the top of the postcard and threaded/tied some straw that she had on hand (hence why she is named Martha - the amount of supplies she has on hand is impressive!)

Again...thought she was done...and she wasn't.

This is my favorite part. She looked at me and said..."I feel like it should say something about the magnets. I got it...Have a "magnet"ficent Christmas!" and there the epiphany happened. she didn't hesitate for a second and the creative juices had taken over. She printed up the little play on words on her computer, printed it, and glued it on the postcard above the letters.

This is such a great idea for a teacher's gift and has purpose - which is my favorite part (aside from the fact that it cost her nothing because she already had all of the supplies - simply fabuless!)


If you are trying to scramble up a last minute teacher's gift before the holidays - give this one a try!

sincerely fabuless,
Candace admiring Leigh in Virginia.


Pin It

Friday, December 16, 2011

{Wrapped With a Bow!}

Crafting, crafting, crafting. I have been crafting during nap times and bed time...soooo much crafting going on. I feel like the days are flying by and I have so many little things I want to get done before Christmas!..not to mention attempting to find time to blog about it. Oy Vey! (one of my favorite phrases of exasperation!)

So, this will be fairly short and sweet. I have been making bows...and headbands..well a headband so far. I made rosette/button bows for a bow exchange with some other 'moms of daughters' at church..and I specifically made a bow and headband for my little Cora to wear on Christmas Sunday. Take a look..


To make these cute rosette bows..cut material into about 20 in by 2 in strips..fold horizontally twice..roll tightly until inner spiral is about a half an inch across (or whatever you prefer), then start twisting the fabric over on itself..and hot glue every couple of twists. It's really just a 'by feel' kind of thing :) Do what feels right, haha. :) I use about 3 of the 20 in. by 2 in. strips to make the size bow you see in the picture (just fold each the same and hot glue it to the end point of the previous strip, then keep twisting around and gluing). When you have the size you want, just glue the unfinished end under the flower.

Click Here for tutorial on button flowers


Use lace or ribbon of some sort to cover your clips (my sister gave me clips that she got at a beauty supply store..just a few bucks for like 100 clips..fabuless!)..use hot glue and glue to the inner lower part first..then wrap around and glue around outer clip edge..and glue to top then under top portion...from there just glue your bow to the top of the clip..done..awesome!


I made this headband out of a silky-esque black shirt that I never wear anymore..fabuless! I'm all about re-purposing material! I stitched on a little slot for the clip to slide on as well. I love wide headbands on babies, so that's the style I go for. My best advice..don't be afraid to experiment..chances are it will work out! And, you'll gain confidence along the way. My sewing machine and I have become great friends throughout my many sewing experiments, and now we seem to have a good understanding! :)

It'd be cute to make bows for friends/family members and put them on a Christmas gift rather than your typical gift bow...just a thought. Have fun!


sincerely fabuless, the windy city.

Tuesday, December 13, 2011

{Let it Snow, Let it Snow, Let it Snow}

Guest Blogger: {Allyson Drake, Not Your Average Joe Globes}

I have been stalking these snow globes at Anthropologie for a while, trying to talk my husband myself into spending the money to add these to my Christmas Décor collection. But alas, with these starting at $25 a piece, I didn’t get very far.


HERE

So my friend and I did some looking around and found everything we needed to get these into our homes with less damage to our wallets.

Jars: had 2 already, spent $1.50 on the third
Trees & Santa: $1.50 total at the dollar store
Snow: $3.99 (but used a 40% off coupon so it was more like $2.40 and still have over half the bag left for future Christmas crafts)
Spray glue: had.
Glitter: supplied by my generous friend Christie


Once again, I forgot a before picture. {Who else blows past their before pic and jumps right into their projects??} But we started with basic green plastic trees and a Santa, then sprayed them with white spray paint. We covered the Santa completely, but gave the trees more of a flocked look. After we let them dry {well, mostly dry} we sprayed them with spray adhesive and drenched them in glitter.


The glitter colors: Martha Stewart Smokey Quartz for Santa, and Feldspar/Aquamarine Crystal combination for the trees

To give them a little lift in the jar {so we could have more snow around the bottom of the figures} we glued them to parts of a water bottle. Cap, bottom of the bottle, and top of a bottle.
{Who doesn’t have an old bottle lying around?}.

And Voila!


I like the fake snow, but if I were to do it again I might try salt or something with a smaller, finer texture. This snow makes me want to eat something sprinkled with coconut.

I still really want one in a salt shaker like the Anthropologie one pictured above, or something fun like that… So maybe I’ll have to add to the collection next year.
But until then..


..they’ve found their spot with my wreath.


sincerely fabuless, Allyson in California
for the holidays.

Wednesday, December 7, 2011

{Jingle All the Way}

For those who haven't quite finished their Christmas shopping yet..you should consider this for a little one on your list..


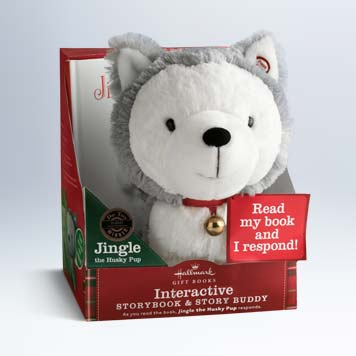
Jingle the Husky Pup!

I'm planning on enjoying this interactive book with Cora before Christmas, but it would be a fun gift for Christmas morning too!

Click here for a Hallmark $5 off coupon!
(when you spend $10 or more)

Tuesday, December 6, 2011

{Holiday Happenings}

The Windy City is getting especially cold and windy this time of year, so Cora and I decided to hop on a plane and visit my family in Virginia for a couple of weeks. I've been here for about a week and a half so far, and the majority of my evenings have been filled with "crafting" as I like to call it. A lot of what I've been making are items I can't post about yet because they'll be included with Christmas gifts for friends and family this year..and I wouldn't want them getting a sneak peek on the blog! *so I apologize for withholding some craftiness! Back to my original thought about being here in Virginia..

My mom told me the other day that I've brought Christmas cheer to our home since I've arrived..I consider that a great compliment! The home as is..is very beautiful, but with Christmas decor it has transformed into a cozy holiday retreat! I have always been the one wanting to put up the Christmas tree the day after thanksgiving (maybe even sooner! haha)..in fact, McKay and I put up our tree (in Chicago) and other holiday decor a few days before Thanksgiving this year :) Something magical happens once your tree is decorated and you turn on the lights! Whether your tree is filled with family ornaments, beautiful and shiny bulbs, snowflakes and snowmen, ribbons and bows, or even strands of popcorn..each is so special in their very own way!

This year, my mom mentioned that she may want a more formal Christmas tree. She had seen some beautiful ornaments when she visited Germany, but they were really pricey, so she was hoping I could find some at a reasonable price. We decided on the colors red and gold. I found beautiful and elegant ornaments at both Wal Mart and Target..about 35 ornaments for $15! I purchased a pack of red and a pack of gold and was on my way..fabuless! My mom had some red and gold/ivory bows from previous years that I incorporated into the tree as well. I also added in a few of the really special ornaments..because we all have ornaments that pull at our heart strings a little bit. For example..my parent's 10 year anniversary ornament..and my mom's Chatty Cathy ornament :)

Take a look at the tree...


Yes, Chatty Cathy is missing a shoe..but most loved ornaments are missing one thing or another, right?

I was also able to find some great deals on garland and bows at Michael's craft store. Garland was 50% off, so each piece of 18 foot garland ended up being only $3! And, they had lots of simple but nice bow options for $1.99 each. Go check it out if you still need to pick up some of these items!


It's still the first week of December, so make it your goal to finish up your decorating so you can enjoy the cozy feel of the holidays for a bit longer this year.

**Comment if you have any fun decor ideas you'd like to share!


sincerely fabuless, the not so windy city.

Friday, December 2, 2011

{It's the Most Wonderful Time of the Year}

Guest Blogger: {Allyson Drake, Original Christmas Wreath!}

I’ve been seeing pin after pin on Pinterest of awesome holiday wreaths and started dreaming up one of my own. And well Christmas wouldn’t be Christmas without a wreath, would it? So I gathered supplies:


Foam circle: Dollar Store
Scraps of white fabric: left over from THIS project.
Good lookin’ yarn: Michael’s $3 after a coupon


Not pictured:
Yellow and cream felt, wooden beads, pearl topped straight pins, plain small straight pins, twine, and lace trimmings…all from my scrap stash..fabuless!


Putting it together was simple.
Wrap wreath in Fabric scraps by securing the beginnings and ends with small straight pins.
Wrap and wrap and wrap yarn {lay it on thick or there will be gaps}, again securing beginnings and ends with pins.
Then add embellishments {Deciding how to embellish was the hardest part for me}. I ended up making Holly with felt and beads, securing those with the pearl pins through the beads, and adding a thin bow of unraveled twine {untwisting one strand of twine into 3-5 skinnier strands}

Wrapping the wreath in fabric before the yarn isn’t necessary, but the floral foam is grainy and this way if I get tired of this wreath {inevitable…remember design A.D.D.?} I can take the yarn off and use it again, sans green grainy bits. I have a feeling this little foam circle will be “outfitted” many times.

But for this season:


Hello beautiful.

And want an easy, cute tip for hanging?


Secure a piece of trim or lace with holes in it to the back of your wreath using small plain straight pins. Then simply hang that on a nail, or string ribbon or twine {my personal favorite} through to hang it.

Merry December and Happy New Decorations!


sincerely fabuless, Allyson in Philly.

Thank you Allyson for sharing this fabuless wreath idea! I'm sure we'll all be rounding up the necessary supplies over the next few days!

Please be sure to check our blog frequently throughout this holiday season as we'll be putting up crafts, recipes, and decor ideas to bring the joy of the holidays into your home!